Nuxt 3 integration
We recommend using Nuxt I18n (@nuxtjs/i18n) to use Vue I18n with Nuxt 3 with advanced features such as localized routing, SEO tags and more.
Creating your own Nuxt 3 integration
The following is a tutorial on setting up a Nuxt 3 application with your own integration by adding Vue I18n through a Nuxt plugin.
NOTICE
This integration tutorial doesn't support advanced i18n features (such routing and SEO tags) and is intended for demonstration purposes, consider using the Nuxt I18n module check out its docs at i18n.nuxtjs.org for more details.
Requirements
Node.js requirement for this tutorial is the same environment as Nuxt 3.
Please check here for Node.js version of Nuxt 3.
Example codes
You can get the code for the tutorial below on examples/frameworks/nuxt3.
You can also see a deployed app made following this tutorial with a custom GitHub action to provide translations from DeepL in this nuxt3-app-vue-i18n project.
Setup vue-i18n on Nuxt 3 Application
We will now set up the initial environment for using Vue I18n with Nuxt 3.
Create Nuxt 3 application
Run the following command to create a Nuxt 3 application:
npx nuxi init nuxt3-app-vue-i18npnpm dlx nuxi init nuxt3-app-vue-i18nOnce we have run the above command, the created Nuxt 3 initial project will have the following directory structure:
cd nuxt3-app-vue-i18n
tree -L 1
.
├── README.md
├── app.vue
├── nuxt.config.ts
├── package.json
└── tsconfig.json
Install Vue I18n
Install Vue I18n with the following command:
npm install vue-i18n -Dyarn add vue-i18n -Dpnpm add -D vue-i18nSetup Nuxt plugin
Create a plugins directory as follows:
mkdir pluginsNext, create a Nuxt plugin file to set up Vue I18n.
touch plugins/i18n.tsOnce created, define the plugin as follows:
import { createI18n } from 'vue-i18n'

export default defineNuxtPlugin(({ vueApp }) => {
  const i18n = createI18n({
    legacy: false,
    globalInjection: true,
    locale: 'en',
    messages: {
      en: {
        hello: 'Hello, {name}!'
      }
    }
  })

  vueApp.use(i18n)
})
Configuration of locale resources to localize a Nuxt 3 application is described in the next section
Run the Nuxt 3 application
Let's see if Vue I18n works with Nuxt 3.
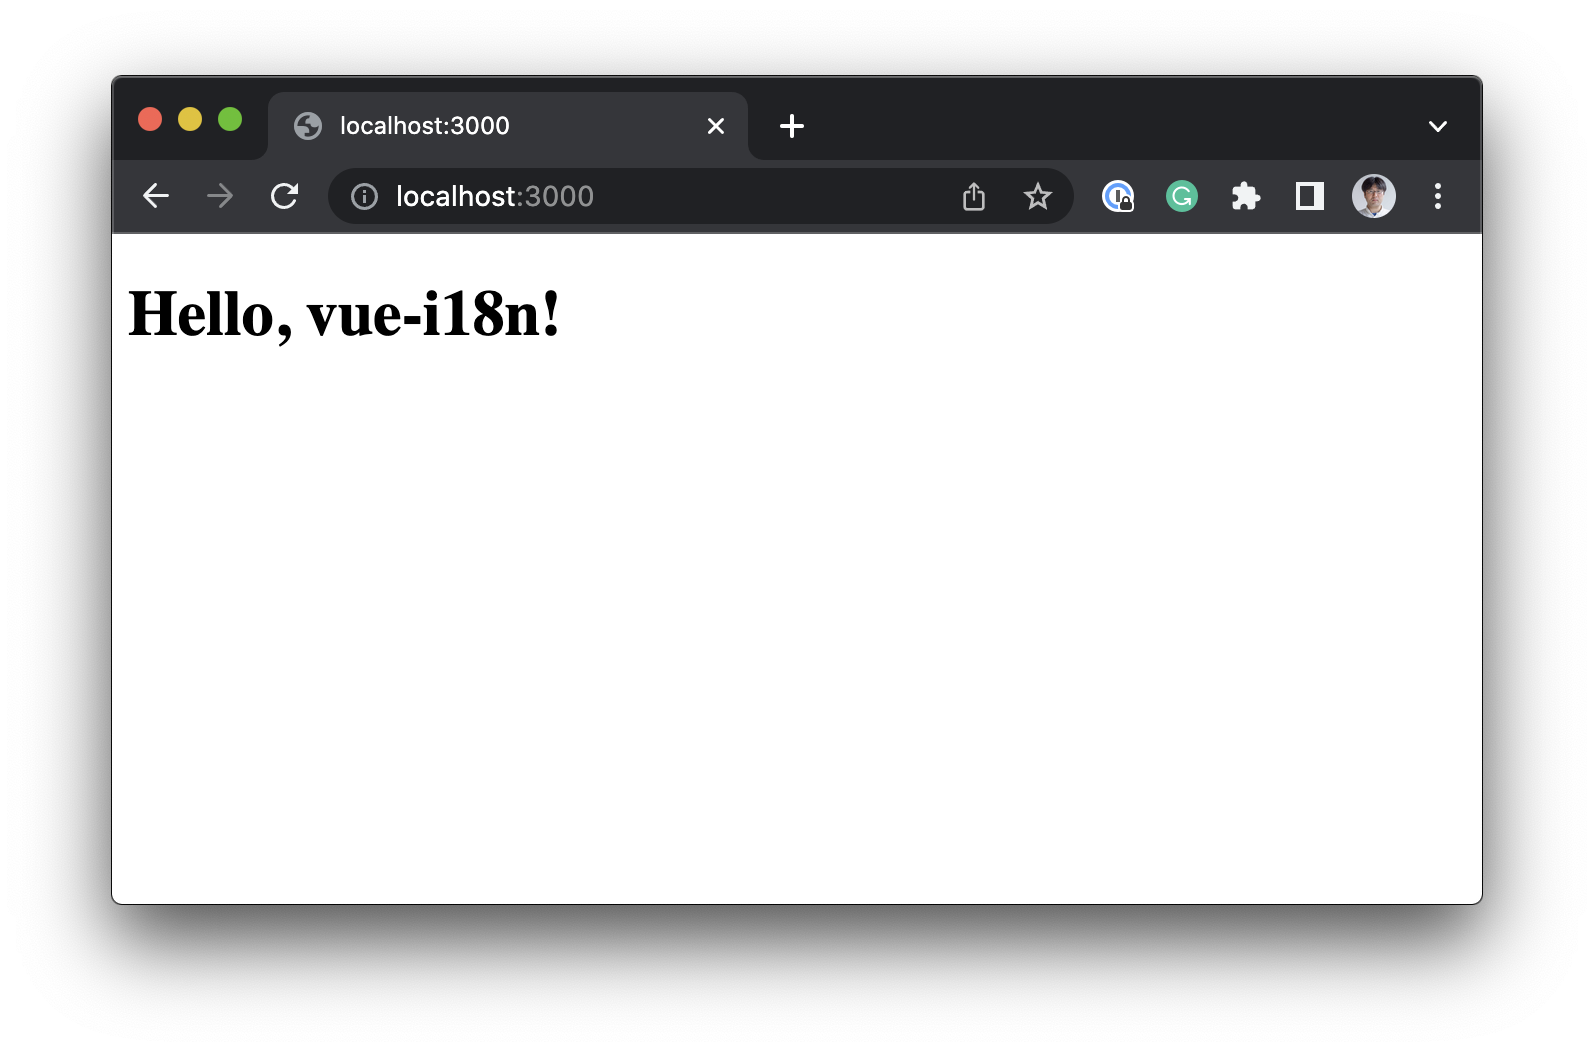
We will edit app.vue of the setup Nuxt 3 application as follows:
<template>
  <div>
   <NuxtWelcome />
   <h1>{{ $t('hello', { name: 'vue-i18n' }) }}</h1>
  </div>
</template>
We have edited and saved, run the following command to run the Nuxt 3 application in local:
npm run devyarn devpnpm devOnce the application is served on http://localhost:3000, we'll see the following:
Localize your Nuxt 3 application
So far, we have been able to integrate Vue I18n into our Nuxt 3 application. Let's implement language switching and import locale resources from outside.
By implementing language switching we are effectively, i18n our Nuxt 3 application. 🌎 🌍 🌏
Also, when we separate the locale resources from the source code (externalizing them), we can use a separate workflow with the help of the Localization service in order to localize the app.
In the following sections, we will enable support for English, French, and Japanese on out Nuxt 3 app.
Add language switching
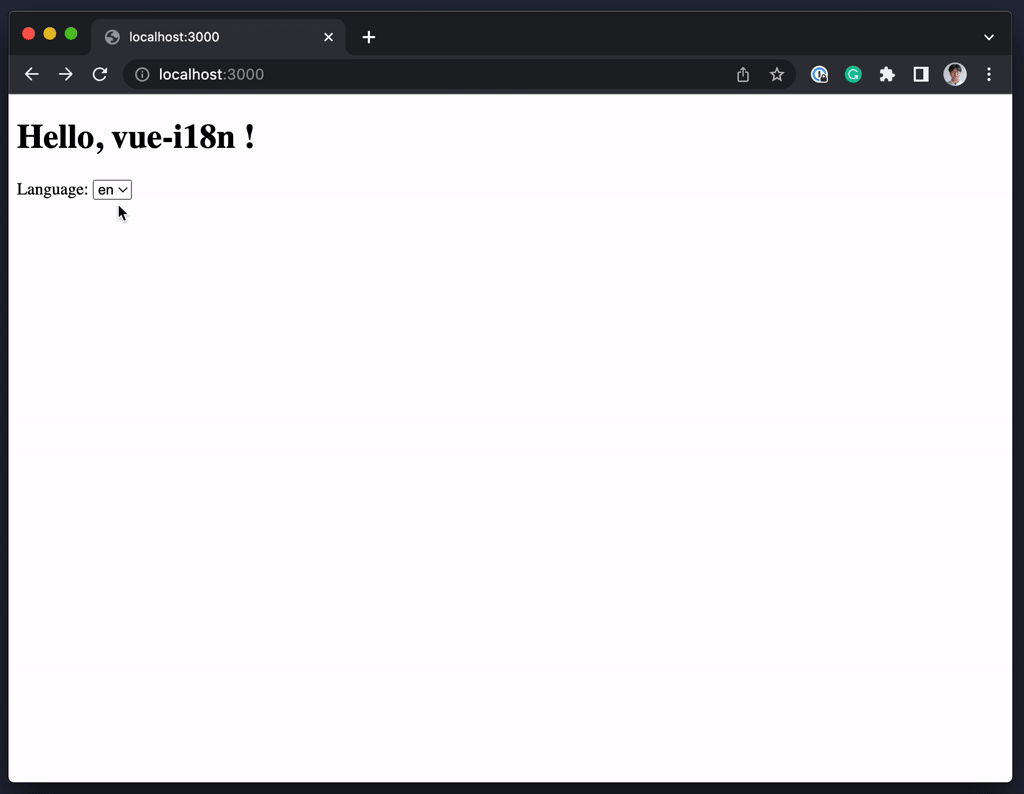
We will add language switching feature to app.vue as follows:
<template>
  <div>
    <h1>{{ $t('hello', { name: 'vue-i18n' }) }}</h1>
    <form>
      <label for="locale-select">{{ $t('language') }}: </label>
      <select id="locale-select" v-model="$i18n.locale">
        <option value="en">en</option>
        <option value="fr">fr</option>
        <option value="ja">ja</option>
      </select>
    </form>
  </div>
</template>
Language switching is implemented using the select element on form. The value of each option is defined as the value of the locale code, which will be explained later in the externalization of locale resources.
The value of each option defines the value of the locale code, which will be explained later in the externalization of locale resources.
Externalize locale resources
We will define the locale resources as external.
There are several file formats for resources supported by Vue I18n, we'll opt for JSON in this particular case.
Let's create a non-"Nuxt-3-standard" directory named locales by running:
mkdir localesNow, let's create the JSON files for each of the locales we want to support:
touch locales/en.json # for english
touch locales/fr.json # for french
touch locales/ja.json # for japanese
Let's populate them with the following:
For english at locales/en.json:
{
  "hello": "Hello, {name}!",
  "language": "Language"
}
For french at locales/fr.json:
{
  "hello": "Bonjour, {name}!",
  "language": "Langue"
}
For japanese at locales/ja.json:
{
  "hello": "こんにちは、{name}!",
  "language": "言語"
}
Import locale resources
Let's "register" the locales in our plugin (plugins/i18n.ts) as follows:
import { createI18n } from 'vue-i18n'
import en from '../locales/en.json'
import fr from '../locales/fr.json'
import ja from '../locales/ja.json'

export default defineNuxtPlugin(({ vueApp }) => {
  const i18n = createI18n({
    legacy: false,
    globalInjection: true,
    locale: 'en',
    messages: {
      en: {
        hello: "Hello, {name}!"
      }
      en,
      fr,
      ja
    }
  })

  vueApp.use(i18n)
})
The messages option will be the one holding the local resources we register to it and being as fine-grained as we want. This granularity facilitates integration with the localization service.
Let's run npm run dev (or yarn dev or pnpm dev) and head to http://localhost:3000 to see if the changes so far work.
The Nuxt 3 application is now ready for basic internationalization! 🎉
Optimize with @intlify/unplugin-vue-i18n
So far, you have been able to use Vue I18n to support language switching on the Nuxt 3 application. Also, by externalizing the locale resources, you have separated them from the source code, making it easier to manage locale resources and integrate with the localization service.
However, as described in Optimization, the Nuxt 3 application prepared so far is sub-optimal in its bundle size.
Since Vue I18n v9, the message compiler allows pre-compiling of locale resources for improved performance, but has not yet been optimized for that performance.
Enter @intlify/unplugin-vue-i18n, a Vue I18n to optimize performance.
Install @intlify/unplugin-vue-i18n
npm install @intlify/unplugin-vue-i18n -Dyarn add @intlify/unplugin-vue-i18n -Dpnpm add -D @intlify/unplugin-vue-i18nConfigure Nuxt config
Configure nuxt.config.ts like the below:
import { defineNuxtConfig } from 'nuxt'
import { resolve, dirname } from 'node:path'
import { fileURLToPath } from 'url'
import VueI18nVitePlugin from '@intlify/unplugin-vue-i18n/vite'

// https://nuxt.com/docs/api/configuration/nuxt-config
export default defineNuxtConfig({
  build: {
    transpile: ['vue-i18n']
  },
  vite: {
    plugins: [
      VueI18nVitePlugin({
        include: [
          resolve(dirname(fileURLToPath(import.meta.url)), './locales/*.json')
        ]
      })
    ]
  }
})
The bundler for Nuxt 3 is vite by default. So we will use the vite option here for optimization.
In vite.plugins, the plugin for @intlify/unplugin-vue-i18n is configured. As an option for this plugin, the include option specifies locale resources in json format placed in the locales directory. This allows @intlify/unplugin-vue-i18n to pre-compile locale resources at bundle time using Vue I18n message compiler internally. This improves the translation performance of Vue I18n and consequently the rendering performance of Nuxt 3 applications.
Inside of bundling with optimization
Once finished with the setup, run npm run dev to check it out!
After accessing http://localhost:3000, the behavior of the Nuxt 3 application remains the same, but there is a change in the bandwidth of the Nuxt 3 application.
The following is a comparison of bundle sizes measured in the network tab of devtools with and without @intlify/unplugin-vue-i18n:
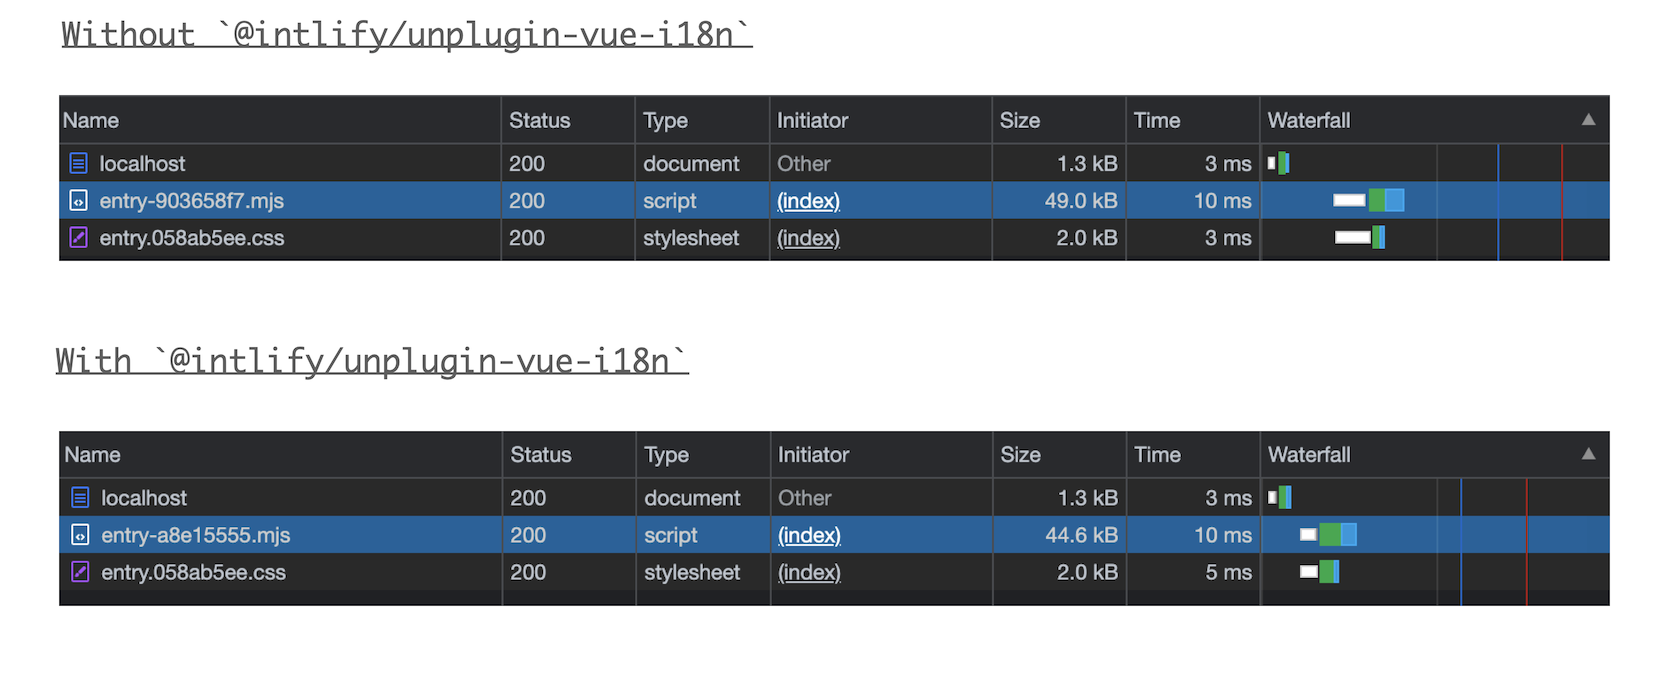
The area highlighted in blue is the code bundled by vite.
By setting up this plugin, the plugin will internally set up a Vue I18n module that is runtime-only. Specifically, vite config resolve.alias, set the vue-i18n alias to use only the Vue I18n runtime (vue-i18n/dist/vue-i18n.runtime.esm-bundler.js). This setting reduces the bundle size since the message compiler used by Vue I18n is not included.
About details, see @intlify/unplugin-vue-i18n docs
Also, you can see the changes in the bundling of locale resources.
Code for locale resources, depending on whether or not the @intlify/unplugin-vue-i18n plugin to vite.plugins is set. Below:
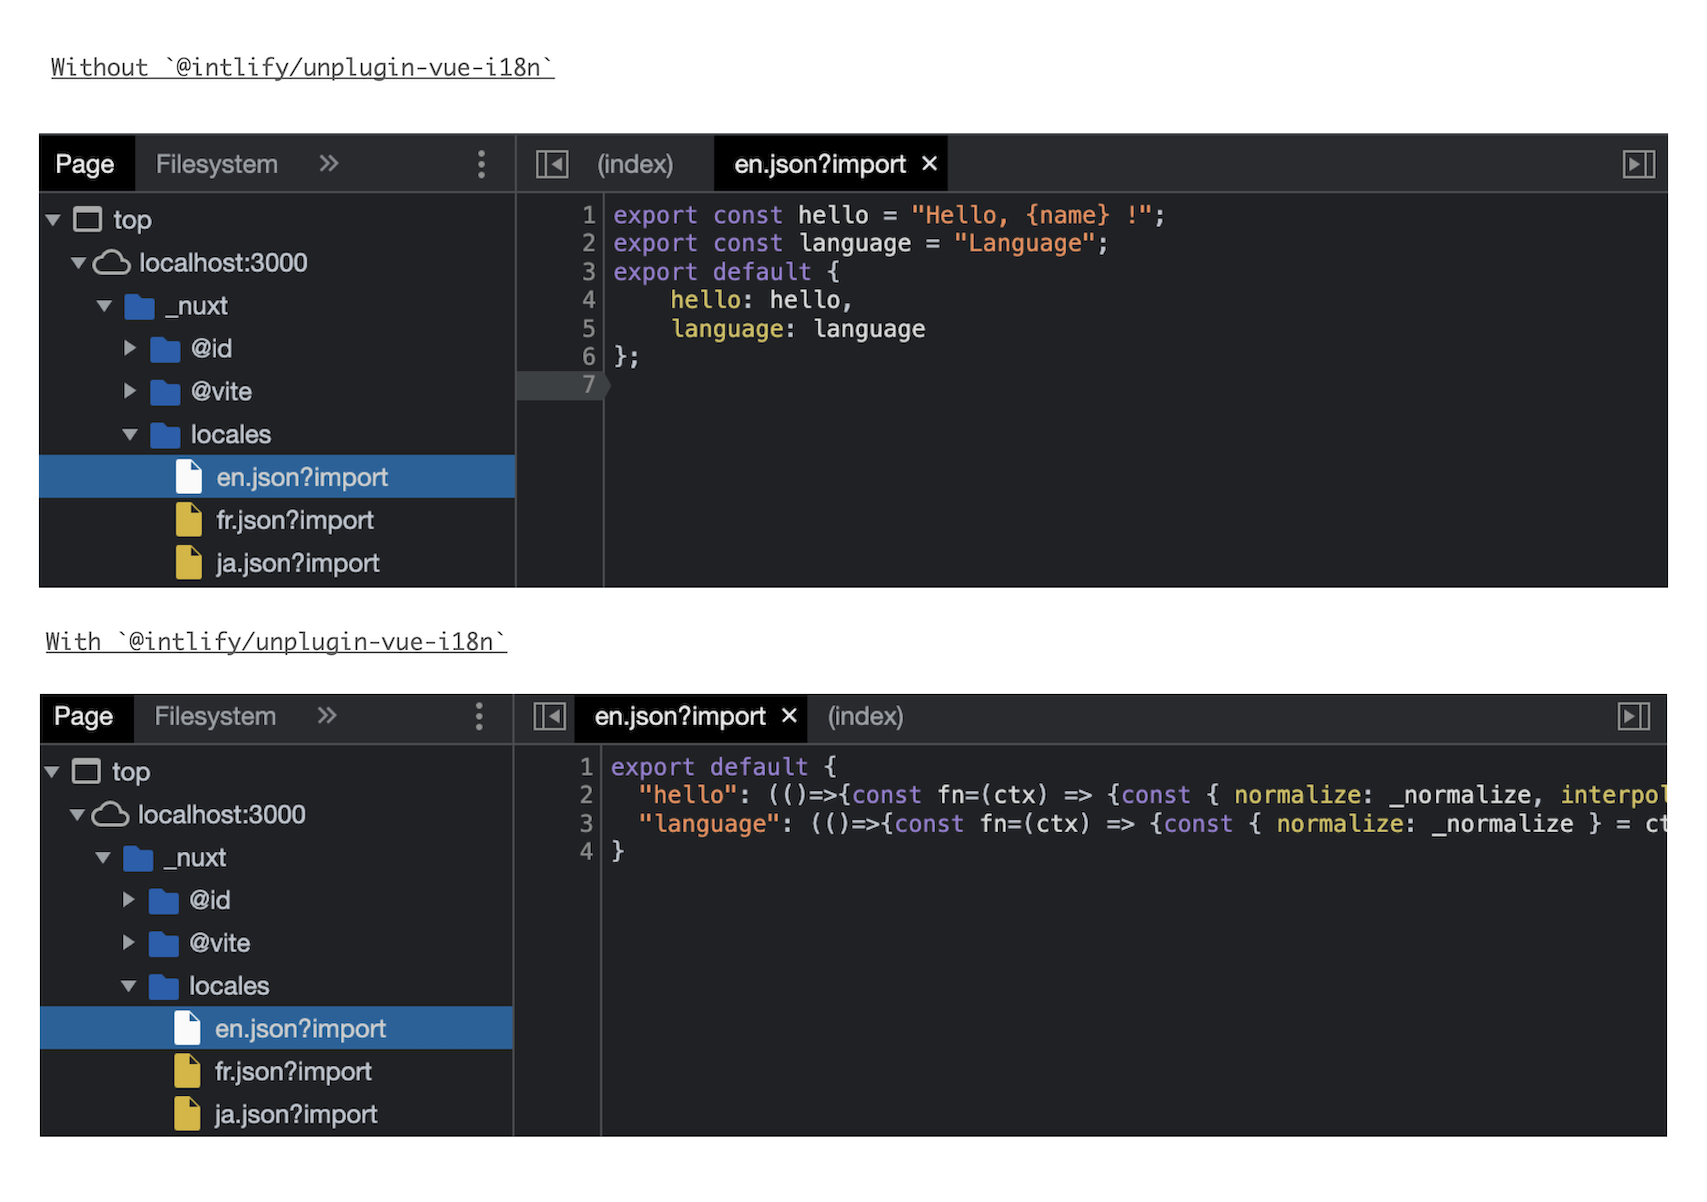
Without the @intlify/unplugin-vue-i18n plugin to vite.plugins, locale resources are bundled as json, but with this plugin set, locale resources are converted from json to JavaScript code for bandwidth.
Vue I18n just call the functions since they have already been compiled.
In this guide, the Nuxt 3 application is small, so we can not enough experience the performance of the optimization but as the application gets larger, it will definitely benefit from it.